How to verify Cisco IPSEC tunnel ISAKMP phase

Once you are done configuring the IPSEC VPN tunnel, we will need to verify the connectivity between sites. So, will discuss these commands in bit detail.

Show crypto isakmp sa

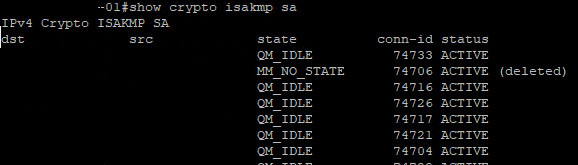
Above command will tell us the status of our ISAKMP negotiations, here are some of the common ISAKMP SA statuses

The following four modes are found in IKE main mode

  • MM_NO_STATE – ISAKMP SA process has started but has not continued to form (typically due to a connectivity issue with the peer)
  • MM_SA_SETUP – Both peers agree on ISAKMP SA parameters and will move along the process
  • MM_KEY_EXCH – Both peers exchange their DH keys and are generating their secret keys. (This state could also mean there is a mis-matched authentication type or PSK, if it does not proceed to the next step)
  • MM_KEY_AUTH – ISAKMP SA’s have been authenticated in main mode and will proceed to QM_IDLE immediately

The following three modes are found in IKE aggressive mode

  • AG_NO_STATE – ISAKMP SA process has started but has not continued to form (typically do to a connectivity issue with the peer)
  • AG_INIT_EXCH – Peers have exchanged their first set of packets in aggressive mode, but have not authenticated yet
  • AG_AUTH – ISAKMP SA’s have been authenticated in aggressive mode and will proceed to QM_IDLE immediately

The following mode is found in IKE Quick Mode, phase 2

  • QM_IDLE – The ISAKMP SA is idle and authenticated

Cisco FMC Access Policies and Rules

Access Control Policies can be accessed Policies -> Access Control -> Acess Control

Under the ACPs, there are few categories

  • Prefilter Policy – An ACL check that runs before the ACP evaluation. This allows or denies traffic without deep packet inspection, which may improve performance
  • SSL Policy – This tells the ACP how to handle encrypted traffic. This may decrypt traffic for inspection, block encrypted traffic, or allow encrypted traffic
  • Identity Policy – Used along with Realms to associate traffic with users

Access Control Rules

The access rule determines how to handle unmatched traffic. The default action may be a system policy, a policy inherited from a parent, or a custom Intrusion policy.
Default system actions include:

  • Block all traffic – Block without further inspection. This is the traditional ACL approach. Only allow through traffic that is explicitly permitted
  • Trust All Traffic – Allow without further inspection
  • Intrusion Prevention – Forward traffic to an Intrusion Policy for further inspection
  • Network Discovery – Used for discovering users and hosts only. Does not block traffic

Access Control Rule Configuration

When adding a new rule, there are many options (7) to choose from. Below section will walk through them one by one.

  • Allow – Allows traffic. There may yet be more inspections, such as Intrusion and File policies
  • Trust – Sends traffic straight to the egress interface, without any extra inspections. Identity policies and rate limiting still apply
  • Monitor – Logs traffic, and continues to the rest of the rules
  • Block – Drops traffic silently, causing the connection to timeout
  • Block with reset – Drops traffic, and sends a TCP FIN, so the connection closes rather than times out
  • ​Interactive Block – Displays a web page with conditions that users may accept. This is where the Interactive Block Response Page comes into play
  • ​​Interactive Block with Reset – Combination of interactive block, with a TCP FIN