Disaster Recovery - Chathura Ariyadasa (He/Him/His)

Step by Step MS SQL Database Cluster configuration using SQL 2019 on Server 2022

Failover Clusters provide seamless Availability and Uptime. On failover clusters, we can run different services/applications. In general, we can run Hyper V VMs, VM Replicas, DHCP and also Database applications. A typical failover cluster consists of 2 nodes (servers), shared network and shared storage systems. 

Today, we will be looking at the exact steps in order to create a failover cluster and how to run MS SQL server on the configured cluster. 

There are some Prerequisites as mentioned below

  1. Active Directory infrastrcture
  2. AD administrator account
  3. A shared storage system (iSCSI, FCoE or FC supported protocols)
  4. 2 or more nodes (Servers)
  5. MS SQL server ISO
  6. Functional DNS server
  7. Few free IP addresses

Lets look at my setup

Server Name dc.chatz.local node1.chatz.local node2.chatz.local
Server IP 192.168.79.129 192.168.79.130 192.168.79.131
Installed Roles

Active Directory / File Server (iSCSI) / DNS

Failover Cluster Manager Failover Cluster Manager
Notes

iSCSI shares

512 MB – Witness

20 GB – Cluster Shared Volume

192.168.11.100  (for cluster heartbeat)

192.168.11.101 (for cluster heartbeat)

This process consists of 2 phases, Phase 01 would be the Cluster Creation and Phase 02 is the MS SQL DB Cluster setup.

Phase 01 – Windows Failover Cluster setup

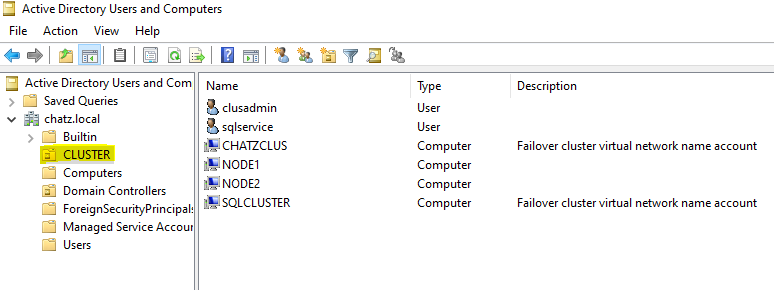
NOTE: When working with the AD services, make sure to create an OU and place all the cluster related objects in the OU which you create. As per my setup, the OU looks like this

As the very first step, you need to install Failover Cluster role on all the participating nodes (in this example, we have only 2). Once you are done with the role installation, apply the Windows patches. And then you may finalize setting up the iSCSI shares. Finally, make sure to add all those nodes to the Active Directory Domain. 

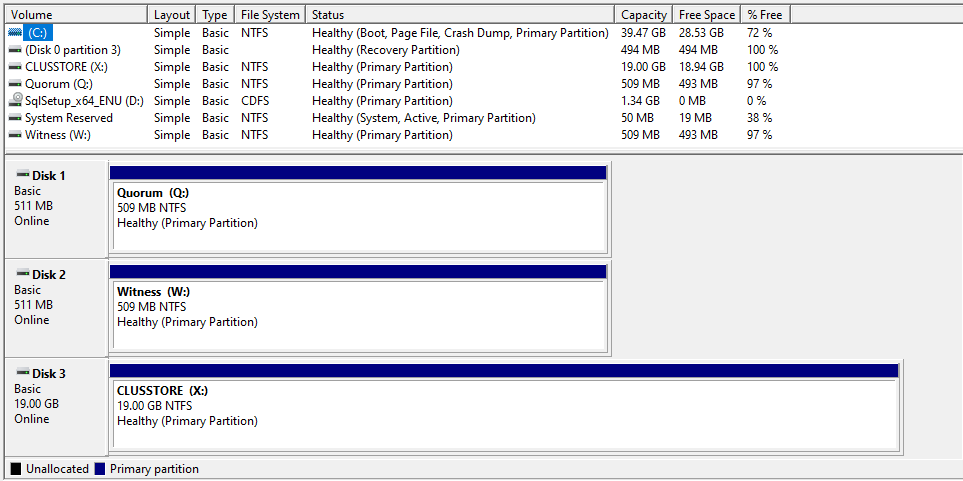
Then, you need to add those iSCSI storage as volumes on the selected nodes. This can be done using the Disk Management console.

Once you are done with assigning the volumes, you are good to validate the cluster. You can simply access the Failover Cluster Manager role from a selected node

Continue reading “Step by Step MS SQL Database Cluster configuration using SQL 2019 on Server 2022”

When you select the Validate Configuration, you are supposed to select all the participating nodes.

When you select the nodes, it will look like below

You are good to run the cluster valaidation 

Once the tests are completed, you may see the completion notification

If you see any errors, you must fix all those issues before attempting Cluster Creation. If you do not see any errors, you may select the “Create the cluster now using the validated nodes…

During the wizard, you will be required to assign an IP for the Cluster Management interface. 

Once you confirm the details, it will try to create the cluster

In the above step, cluster will add all the free and eligible storage to the cluster. You dont have to worry about this process. You can always assign/unassign the storage as required.

At this stage, the cluster has been created and you can see the managment console

Once the cluster is created we may need to verify the attached resources (Networks / Nodes/Storage).

Nodes in Cluster

Storage in Cluster

Networks in Cluster

Here, you will see 2 networks, External Network is for client access and Heart Beat Network has been reserved for cluster health and heartbeats. By doing this you ge the chance to isolate the heart beat network form the external client access. 

If you will have to add aditional storage to the cluster, you can simply add those from the disk storage section. As you can see on the screenshot, the Cluster Disk 1 is not assigned to any cluster role and marked as “Available Storage”

When you add the Storage to the cluster group, it will be marked as CSV

Now the cluster is complete and we may need to look at creating the cluster roles. The most important thing in a cluster is the roles which are configured and running. In this example, we dont have any roles configured

In order to configure a cluster role, simply right click the Roles and configure the role as required

We are not going to configure any of the roles at this time as our intention is to setup MS SQL Database Cluster. If we are supposed to use another Database system, we may utilize the DTC role. So the clutser is ready to be used and working properly as expected. Will proceed to the Phase 02, which is MS SQL Failover Cluster setup.

NOTE: If you wish to use a web based management UI, you can always use the Windows Admin Center. Simply download the utility and access the cluster resources remotely.

Phase 02 – MS SQL Failover Cluster setup

We are going to setup the MS SQL Cluster on the configured cluster resource. We need to mount the MS SQL ISO on all the cluster nodes. Once the ISO is mounted, we can simply start the setup wizard.

Under the Installation section, select “New SQL Server failover cluster installation

After that it will run few tests to verify the cluster health

If no errors are captured during the test, we can safely proceed to next step. Selecting the SQL features.

In the next step, we are required to provide a Name to the MS SQL Clsuter 

Then, we should be able to select a compatible cluster disk to store the MS SQL databases. During the cluster disk selction process, a healthy CSV is a must.

Even for the MS SQL Cluster, an IP address is required for the management purposes. When you access the Database through SQL Management tools, either the DNS or IP is required.

Once the IP address is assigned, will have to configure the SQL service account.

Time to proceed the MS MSQL Cluster installation on Node 01

Once the installation is completed and successul, we can see the below

So the SQL Installation on Node 01 was a success, then will proceed to the SQL Installation on Node 02. On the SQL setup wizard, we are going to select “Add node to a SQL Server failover Cluster

Simply, verify the settings and proceed 

All the preconfigured values will be populated, since we configured those settings during Node 01 installation.

Finally, we have completed setting up the MS SQL Cluster installation. We have 2 nodes with MS SQL server installed and configured. We shall verify the MS SQL Cluster configuration by accessing the failover cluster manager. First, will look at the cluster role and then the Nodes.

Both the Role and Nodes seems to be fine. 

Not just the resources, we need to verify the MS SQL related services as well

You can verify the Databases and functionalities by accessing the SQL Management Studio. Luckily, our configuration seems complete and healthy.


New features of Win Server 2022 Failover Clustering

Failover Cluster feature being one of the top ones on Windows Servers. So Microsoft keeps adding new enchancements. Lets discuss on these.

Cluster Affinity with Azure Stack HCI

Affinity is a rule you would set up that establishes a relationship between two or more roles (i,e, virtual machines, resource groups, and so on) to keep them together. AntiAffinity is the same but is used to try to keep the specified roles apart from each other. AntiAffinity was only available upto 2019. So basically this provides “Streched Cluster” capabilities. Hopefully across different geo locations. read more https://docs.microsoft.com/en-us/azure-stack/hci/manage/vm-affinity

AutoSites

AutoSites is another feature brought over from Azure Stack HCI. AutoSites is basically what is says. When you configure Failover Clustering, it will first look into Active Directory to see if Sites are configured. If they are and the nodes are included in a site, we will automatically create site fault domains and put the nodes in the fault domain they are a member of.

Granular Repair

When a node goes down for maintenance, crashes, or whatever the case may be, once it comes back up, there is a “repair” job run where data is moved around and onto the drives, if necessary, of the node that came back. A repair is basically a resync of the data between all the nodes. Depending on the amount of time the node was down, the longer it could take for the repair to complete. read more https://docs.microsoft.com/en-us/azure-stack/hci/manage/storage-repair-speed

Cluster Shared Volumes and Bitlocker

Cluster Shared Volumes (CSV) enable multiple nodes in a Windows Server Failover Cluster or Azure Stack HCI to simultaneously have read-write access to the same LUN (disk) that is provisioned as an NTFS volume. BitLocker Drive Encryption is a data protection feature that integrates with the operating system and addresses the threats of data theft or exposure from lost, stolen, or inappropriately decommissioned computers.

BitLocker on volumes within a cluster are managed based on how the cluster service “views” the volume to be protected. BitLocker will unlock protected volumes without user intervention.

SMB Encryption

Windows Server 2022 SMB Direct now supports encryption. Previously, enabling SMB encryption disabled direct data placement, making RDMA performance as slow as TCP. Now data is encrypted before placement, leading to relatively minor performance degradation while adding AES-128 and AES-256 protected packet privacy. Furthermore, Windows Server Failover Clusters now support granular control of encrypting intra-node storage communications for Cluster Shared Volumes (CSV) and the storage bus layer (SBL). This means that when using Storage Spaces Direct and SMB Direct, you can decide to encrypt the east-west communications within the cluster itself for higher security.

[source: Microsoft]