DISM to fix issues that SFC can’t

SFC, which stands for System File Checker, is a built-in administrative tool to verify the integrity of operating system files and to repair files that are corrupt, damaged or changed.

SFC scans have three possible outcomes:

  1. The scan did not find any issues.
  2. The scan did find issues and fixed them.
  3. The scan did find issues and couldn’t repair them (Windows Resource Protection found corrupt files but was unable to fix some of them).

Note: It is recommended that you do a full backup of the Windows system partition before you run DISM.

SFC may also correct issues but it may not resolve the issue that you tried to correct in first place by running it.

DISM comes to the rescue in these situations. Deployment Image Servicing and Management (DISM)  is a command line program for Windows that is used for a variety of purposes.It is available in all versions of Windows starting from Windows 7 and Windows Server 2008.


Plesae always run the DSIM commands with elevated privileges.

Command 01: Dism /Online /Cleanup-Image /CheckHealth – Run this to check status

The command checks the image for the corruption flag and returns its findings to you but does not run repair operations.

Command 02: Dism /Online /Cleanup-Image /ScanHealth – Run this to check component store corruptions

The scan takes longer to complete if corruption is found during the scan of the image.

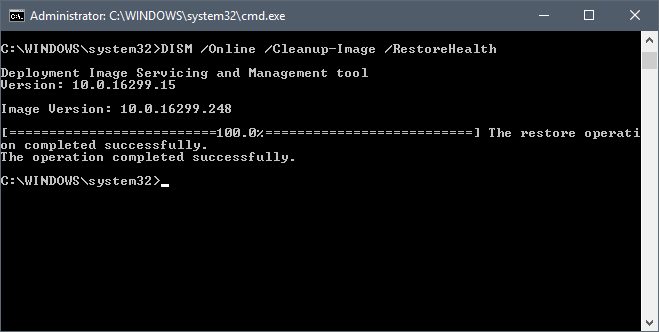
Command 03: DISM /Online /Cleanup-Image /RestoreHealth – Run this to fix the corruption

The /RestoreHealth parameter runs a scan for corruption and attempts to repair any issues that it finds automatically.


How to change default snapshot location in VMware

By default the snapshots which are taken for any vm are stored with their parent in the same directory or storage. Sometimes you may run out of space and you might not be able to take anymore snapshots so in that case you can always use some other location for the storage of snapshots.

But how will you change the default locations of all the snapshots which will be taken for any vm ?

Below are the steps to resolve the above issue;

01. Power off the Virtual Machine

02. Right Click the vm and select Edit Settings

03. Click on Options from the top TAB, select General and open the Configuration parameters

04. Add a new row with the following details

snapshot.redoNotWithParent

05. Save this parameter with a value “true” as shown below

06. Now open the CLI of the host where the vm is located, Go to the vm’s parent directory where all the vm files are stored and open the main .vmx file: Ex;

# cd /vmfs/volumes/xxxxxxxx-xxxxxxxxx-xxxx-xxxxxxxxxxx/test_machine
# vi test_machine.vmx

07. Now add this line anywhere in the .vmx file with the path location where you want your snapshots to be stored

workingDir = “/vmfs/volumes/xxxxxxxx-xxxxxxxxx-xxxx-xxxxxxxxxxx/snapshots”

Save the file and exit

08. Now you need to reload this vm to make the changes take affect.

# vim-cmd vmsvc/getallvms | grep test_machine

09 test_machine [iSCSI-Datastore1] test_machine/test_machine wintestmachine vmx-07

10. Here 07 is the vm id which you can find out using the above command

# vim-cmd vmsvc/reload 07

11. Now when you take snapshots the snapshot files and vm swap files will be created in a different location.