Remove Inactive Tenants from Horizon DaaS Service Center

When the Tenant installation fails, you need to clean up those inactive tenants. In order to do that, you need to delete the relevant columns from the Service provider appliance. We will look at how to delete that information. 

NOTE: All the commands are in Bold Italic

Log into the Service Provider floating IP through SSH

Connect to the Fabric database psql -U admin fdb

Find the tenant ID select id, org_name from organization;

Disable the tenant, using the captured IDs

UPDATE organization SET is_disabled=’t’ where id=’xxxx’;

Finally, we need to delete the records from the below tables

  • Compute Pool – delete from compute_pool where org_id=xxxx;
  • Billing Summary – delete from billing_summary where org_id=xxxx;
  • Organization – delete from organization where id=xxxx;
  • Appliance – delete from appliance where org_id=xxxx;

How to generate a full memory DUMP of a VM

Windows DUMP file provides information about the cause of the system crash. But generating a DUMP file on the ESXi system is a bit different. So, will look at the steps. We have divided the process into 2 main steps.

Step 01 – Create and download a VM snapshot

  • In the VMware environment, select the virtual machine that has issues.
  • Replicate the issue on the virtual machine.
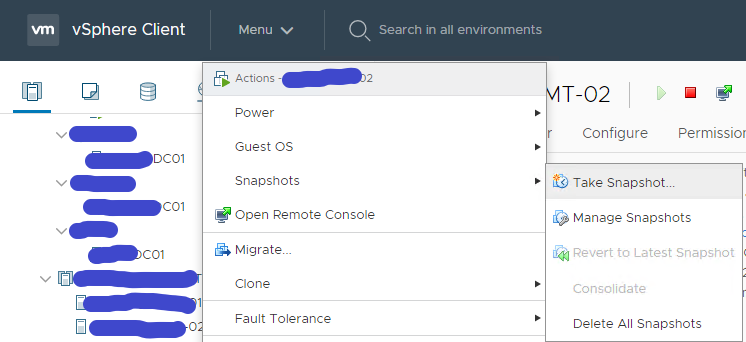
  • Right-click the virtual machine and click Snapshots → Take snapshot.

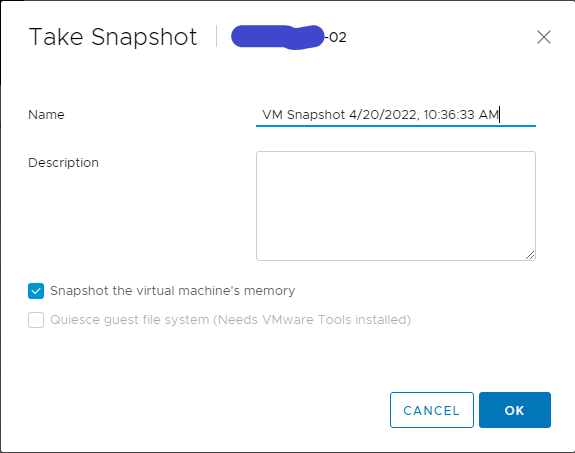
  • Type the name, select the check box next to Snapshot the Virtual Machine’s memory and click OK.

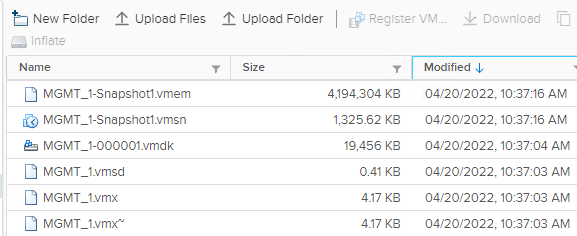
  • Select the virtual machine and click Datastores and click the datastore name.
  • Select the virtual machine, select the .vmsn file (VMware Snapshot file), click Download and save the file locally.

Step 02 – Use the vmss2core tool to create a memory dump from the virtual machine snapshot

  • Download Vmss2core.
  • Select the check box next to I have read and agree to the Technical Preview License I also understand that Flings are experimental and should not be run on production systems. Select the file for your operating system from the drop-down menu (for example, if you want to run the tool on Windows, select vmss2core-sb-8456865.exe) and click Download.
  • Place the vmss2core tool and the VMware snapshot file into the same folder.
  • Run the vmss2core (vmss2core-sb-8456865.exe) in the command line with the following parameters.
  • Specify the guest operating system from which the snapshot was created.

Use quotes if the filename contains blank spaces.

vmss2core-sb-8456865.exe -W8 “virtual_machine_name.vmsn”

  • -W8 —Windows 8 and later or Windows Server 2012 and later.
  • -W —Windows 7 and older or Windows Server 2008 and older.

Finally, you may use the WinDbg tool to analyze the generated Windows DUMP file.