Patch VMware ESXi hosts using command line

There a several ways to patch a VMware ESXi server. vSphere Update Manager (VUM) can update for example a complete ESXi host cluster fully automatic. vSphere Update Manager requires a vCenter Server. When you don’t have a vCenter Server patching can be done from the command line.

Here is a quick overview how to patch an ESXi host;

Step 1. Download the latest patch bundle from the VMware Web site, link

Step 2. Upload the patch bundle (zip) to a datastore with the vSphere Client or using vSphere Web Client.

Step 3. Enable SSH (Start the SSH service and make a SSH session to the ESXi host).

Step 4. Put the host in maintenance mode.

Step 5. Install the patch bundle

NOTE: Using esxcli with the install method has the possibility of overwriting existing drivers. If you are using third-party ESXi images, VMware recommends using the update method to prevent an unbootable state. The following command will install the patch bunde:
Install: esxcli software vib install -d /vmfs/volumes/datastore/vibbundle.zip

Update: esxcli software vib update -d /vmfs/volumes/datastore/vibbundle.zip

NOTES:

  • In the above given example, we have used (-d) switch to install the bundle, if you wish to install an individual VIB you may use the (-v) switch instead of (-d).
  • The volume and the related datastore information can be retrived through the Vsphere client.

Step 6. After the successful Installation, you may reboot the host and remove the Maintenance Mode.

How to change default snapshot location in VMware

By default the snapshots which are taken for any vm are stored with their parent in the same directory or storage. Sometimes you may run out of space and you might not be able to take anymore snapshots so in that case you can always use some other location for the storage of snapshots.

But how will you change the default locations of all the snapshots which will be taken for any vm ?

Below are the steps to resolve the above issue;

01. Power off the Virtual Machine

02. Right Click the vm and select Edit Settings

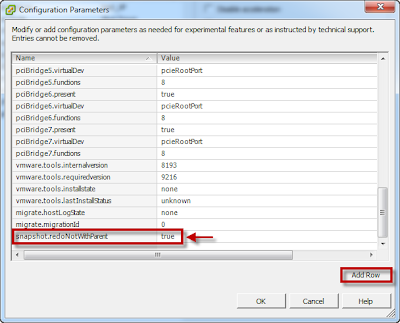
03. Click on Options from the top TAB, select General and open the Configuration parameters

04. Add a new row with the following details

snapshot.redoNotWithParent

05. Save this parameter with a value “true” as shown below

06. Now open the CLI of the host where the vm is located, Go to the vm’s parent directory where all the vm files are stored and open the main .vmx file: Ex;

# cd /vmfs/volumes/xxxxxxxx-xxxxxxxxx-xxxx-xxxxxxxxxxx/test_machine
# vi test_machine.vmx

07. Now add this line anywhere in the .vmx file with the path location where you want your snapshots to be stored

workingDir = “/vmfs/volumes/xxxxxxxx-xxxxxxxxx-xxxx-xxxxxxxxxxx/snapshots”

Save the file and exit

08. Now you need to reload this vm to make the changes take affect.

# vim-cmd vmsvc/getallvms | grep test_machine

09 test_machine [iSCSI-Datastore1] test_machine/test_machine wintestmachine vmx-07

10. Here 07 is the vm id which you can find out using the above command

# vim-cmd vmsvc/reload 07

11. Now when you take snapshots the snapshot files and vm swap files will be created in a different location.